備忘

完全自分向けのメモです。お役に立てると良いのですが。。。あまりにも雑なものは非公開として整理中です

投稿フォーマット

wordpressのバージョンアップに伴って追加された「投稿フォーマット」を使いたくてメモしている投稿です。

Function.php のセットアップ関数部分に以下の記述を追加


add_theme_support( 'post-formats', array( 'aside', 'chat', 
'gallery', 'image', 'link', 'quote', 'status', 'video', 'audio' ) ); 

全部の項目はいらないと思います。


add_theme_support( 'post-formats', array( 'aside', 'gallery', 
'image', 'link', 'quote', 'video', 'audio' ) ); 

こんなところでしょうか。audioもいらないかも知れません。音楽好きなので残しています。

そうすると、記事の投稿画面に、フォーマットという選択BOXが表示されます。
そこで選んだものが、投稿記事を包むタグ(article です)にクラスメイトして「format-****」と付与されます。

例:$lt;artcle class="post-1 format-image" $gt;

CSSだけの操作で表示をコントロールすれば良い場合は、任意の操作を、CSSファイルに書き込むという事になります。。

参照ここ(http://www.mrta26.com/2011/01/20/wordpress-3-1-post-formats/)

角丸 border-radius

CSS3.0 で登場の角丸、border-radius
もちろんIE対応に苦労するわけで・・・・
対策は、いろいろ方法画あるようで・・・
備忘の為、記載してゆきます。

JQueryでの対応が一番簡単かも
1.jquery.corner.js.の場合(角丸以外も出来て面白そうです)
http://www.malsup.com/jquery/corner/
使い方の説明は上記のサイトにありますが、

基本は、$(this).corner("30px");これ
例:idがBOXの要素を5pxで角丸の場合 ↓↓↓↓↓↓↓
<script type="text/javascript">  $(´#box´).corner("5px");</script>
もちろん先にjsを読み込んでおく必要があります。(コピペできるように載せときます)
<script type="text/javascript"
 src="http://ajax.googleapis.com/ajax/libs/jquery/1.7.2/jquery.js"></script>
<script src="js/jquery.corner.js"></script>

そうそうもちろんCSSも


.クラス名{  
    border-radius: 10px;        /* CSS3草案 */  
   -webkit-border-radius: 10px;    /* Safari,Google Chrome用 */  
   -moz-border-radius: 10px;   /* Firefox用 */  
} 

右上、左上、右下、左下


-webkit-border-top-left-radius:  
-webkit-border-top-right-radius:  
-webkit-border-bottom-right-radius:  
-webkit-border-bottom-left-radius:  
-moz-border-radius-topleft:  
-moz-border-radius-topright:  
-moz-border-radius-bottomright:  
-moz-border-radius-bottomleft:  

普通の指定


border-top-left-radius: 55pt 25pt
border-top-left-radius  
border-top-right-radius
border-bottom-right-radius
border-bottom-left-radius

参照:http://www.w3.org/TR/css3-background/#the-border-radius

IE9対策(自動後方互換には、これを記述すべし meta あわせてハック

IE9で対応のはずの、CSS3.0が出来ないと思っていたら、勝手に後方互換するらしい。
head部分に


<meta http-equiv="X-UA-Compatible" content="IE=9" />

これを書き込めば、自動の後方互換を切れるらしい。とりあえず書いとく必要がありそうです。

IEはいろんなところで時間を取らせるブラウザーです。

参照

IE6/IE7/IE8/IE9と他のブラウザを振り分けるCSSハックです。IE9はまだベータ版なので有効にならなくなるかもしれませんがとりあえず。

1.IE6/IE7/IE8/IE9と他のブラウザを振り分けるCSSハック

以下の順番でプロパティおよびセレクタを記述してください。
body {
color: red; /* all browsers, of course */
color: green¥9; /* IE8 and below */
*color: yellow; /* IE7 and below */
_color: orange; /* IE6 */
}
body:not(:target) {
color: black¥9; /* IE9 */
}
•IE6:値の先頭にアンダースコア「_」を付与
•IE7:値の先頭にアスタリスク「*」を付与
•IE8:値の末尾に「¥9」を付与
•IE9:セレクタの末尾に「:not(:target)」を付与+値の末尾に「¥9」を付与

ある作業で必要に迫られて集めたもので、CSSハックを推奨する記事ではありません。

中央寄せ

基本中の基本なのですが、あれどうやったかな~と一瞬思い出すまでに時間がかかるので備忘の為掲載。

CSSによるセンタリング。
・インライン要素は、text-algn:center
・ブロック要素は、; margin:auto widthの設定忘れないように
を使うのは必須。
忘れがちなのはこれ → ブロック要素中のブロックのセンタリング

方法1:
子ブロックに position:absolute; left:50%; を設定
忘れずwidthを具体的なpxで設定して、その半分のpxで、margin-left
高さも中央にする時は、top:50%; margin-top を半分の大きさで

方法2:これでも出来るというだけでオススはしません。
親ブロックのCSSに、text-align:center 縦も中央の場合は、vertical-align:middle
を設定して、子ブロック(中央寄せしたいブロック)に; margin:autoを設定。

ちょっとややこしい。触っていないとあれ?となるよね~

ちなみに、IE6はバグで、text-align:centerでブロック要素もセンタリングできるとか・・・・

参考サイト

Html5とスタイルシートのリセットCSS

Html5が言われてずいぶんと経ちますが、PC向けサイトよりいち早くスマートフォンサイトでは、Html5+CSS3.0でというのが定番ではないでしょうか。
しかし、スマートフォンのブラウザーのバージョンによっては、Html5に対応していなかったりするようで(iPhone3.2)、PC向けサイトだと、まだまだこれからではないでしょうか。
少し古い記事ですがリセットCSSの記事があったので掲載しておきます。

参照サイト http://html5doctor.com/ より

HTML5 Reset Stylesheet
Monday, July 27th, 2009 by Richard Clark.

We’ve had a number of people ask about templates, boilerplates, and styling for HTML 5. Last week, Remy introduced some basic boilerplates for HTML 5, so to keep the momentum going, I’ve modified Eric Meyer’s CSS reset for you to use in your HTML 5 projects.

The code

Let’s start with the complete CSS stylesheet:

/*
html5doctor.com Reset Stylesheet
v1.6.1
Last Updated: 2010-09-17
Author: Richard Clark – http://richclarkdesign.com
Twitter: @rich_clark
*/

html, body, div, span, object, iframe,
h1, h2, h3, h4, h5, h6, p, blockquote, pre,
abbr, address, cite, code,
del, dfn, em, img, ins, kbd, q, samp,
small, strong, sub, sup, var,
b, i,
dl, dt, dd, ol, ul, li,
fieldset, form, label, legend,
table, caption, tbody, tfoot, thead, tr, th, td,
article, aside, canvas, details, figcaption, figure,
footer, header, hgroup, menu, nav, section, summary,
time, mark, audio, video {
margin:0;
padding:0;
border:0;
outline:0;
font-size:100%;
vertical-align:baseline;
background:transparent;
}

body {
line-height:1;
}

article,aside,details,figcaption,figure,
footer,header,hgroup,menu,nav,section {
display:block;
}

nav ul {
list-style:none;
}

blockquote, q {
quotes:none;
}

blockquote:before, blockquote:after,
q:before, q:after {
content:”;
content:none;
}

a {
margin:0;
padding:0;
font-size:100%;
vertical-align:baseline;
background:transparent;
}

/* change colours to suit your needs */
ins {
background-color:#ff9;
color:#000;
text-decoration:none;
}

/* change colours to suit your needs */
mark {
background-color:#ff9;
color:#000;
font-style:italic;
font-weight:bold;
}

del {
text-decoration: line-through;
}

abbr[title], dfn[title] {
border-bottom:1px dotted;
cursor:help;
}

table {
border-collapse:collapse;
border-spacing:0;
}

/* change border colour to suit your needs */
hr {
display:block;
height:1px;
border:0;
border-top:1px solid #cccccc;
margin:1em 0;
padding:0;
}

input, select {
vertical-align:middle;
}

So what’s new?

Quite a bit! The next few sections explain what I changed and why I changed it.

The basics

I started by removing elements that have been deprecated from the HTML 5 specification, like ,

and . (We’ll cover deprecated elements in more detail in another post). I also added new HTML 5 elements, like and, in order to remove any default padding, margin, and borders. I’ve also added an explicit display:block property for elements that are required to render as blocks.

I also removed the explicit unstyling of the :focus pseudo-class. There are two reasons for this. First, by declaring outline:0, you remove the focus identifier for keyboard users. Second, Eric released his stylesheet in good faith that people would explicitly style :focus, but they generally don’t, so it’s safer to leave the default :focus styles in place. (I also set defaults for , since I don’t think that got updated very often either.)

I’ve left the default list styles in place simply as a personal preference. I tend to add the list style back when using Eric’s reset anyway. I have, however, included nav ul {list-style:none;} to remove those pesky bullets from your navigation.

Using attribute selectors

You’ll notice that I’ve included attribute selectors for and . This way, the style will only appear if there is a title attribute on the element. This is primarily for accessibility. For example, we use regularly on this site but don’t always include a title attribute. We think it’s safe to assume all of our readers (no matter what device they’re using) know what HTML stands for. We do still use the element to make sure screen readers read the text as H-T-M-L rather than struggling to pronounce “HTML”.

What’s that bit about mark?

is a new element introduced in HTML 5 used to (you guessed it) mark text in a document. According to the spec: ““The mark element represents a run of text in one document marked or highlighted for reference purposes, due to its relevance in another context.””. I anticipate it will be used for highlighting phrases in search results and other similar purposes. We’ll post more on soon.

Where are all those application elements?

Application elements is a term I’ve loosely used to describe elements like menu, etc. These elements are more likely found in web apps than web sites. I left these out since, at the time of writing, browsers implement barely any of what was “Web Applications 1.0″. Also, this stylesheet is intended primarily for authors serving their pages as text/html, not XML.

Go grab it

The stylesheet is released under a Creative Commons license in the public domain, so you can use it for both personal and commercial work. I thought I’d let Google take care of the hosting, so go grab it from Google Code and let us know about any improvements you make!
長い引用でしたが、html5 としてのポイントは、「新しいタグが対応していないブラウザーだとブロック要素として認識しない」という点で、

article,aside,details,figcaption,figure,
footer,header,hgroup,menu,nav,section {
display:block;
}

特にこの部分が重要だと思われます。

—————–追記 旧IE対策でこれをヘッドに書いておく ————————
Googgleさんから、IE9.js を読み込んでます。
詳細: https://code.google.com/p/ie7-js/
[html]
<!–[if lt IE 9]>
<script src="http://ie7-js.googlecode.com/svn/version/2.1(beta4)/IE9.js" type="text/javascript"></script>
<![endif]–>
[/html]

Word ページ番号(ノンブル)を挿入 途中から入れたい場合

Word では普通にページ番号を入れると、一番前のページから順に番号がふられ、始めの数ページを飛ばした後から1ページとしたい場合には困ります。
バージョンは違っても考え方は以下のとおりでいけると思います。
そういった時の対処方法

まずは考え方です。

1. 「編集記号の表示/非表示」をオンにする
(この作業は飛ばしても大丈夫ですが、ページにどのような設定がなされているか分からなくなり、混乱しがちになるので、やったほうが良いと思います)

2. 「セクション区切り」を入れ「次のページから開始」とする
(ページを入れたい場所の前の所に「セクション区切り」を入れます。
「ここからページをつけるんだ」とWORDさんに伝えるわけです)

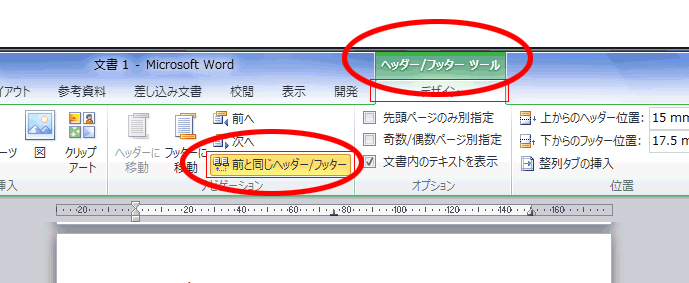
3. 「ヘッダーとフッター」部の「前と同じ」というデフォルトの設定を解除する
(前の段階で、区切りをつけました。今度は「ここからは前のマネをしたらアカン」と、WORDさんに伝える事になります。
いろんな事を自動でしてくれるWORDさん、区切りを入れた時点で「前の設定をチャウねんなぁ~」と気づいて欲しいものです)

4. ページ番号を入れる
(そして入れたいページのヘッダーあるいはフッターにページ番号を入れてください。よくやる作業です。「ページ番号の書式設定」など触ります)
そしてページ番号をいらないところは削除したり、大きさや場所を整えたりしてください。

※以上が、ややこしいですが、やりたいことをするための考え方です。
しかし、困ったことにWORDのバージョンによって、コマンドの位置が違ったり、どこにやりたい作業のボタンがあるのかが違うので注意。
バージョンによる作業の違いを記載しておきます。「セクション区切り」の入れ方が違うようです。

Word2007 以降:
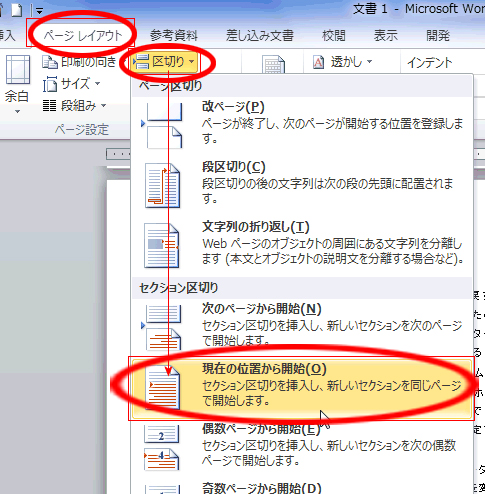
「ページレイアウト」→「区切り」→「セクション区切り」を入れる
Word2003 以前:
「挿入」→「改ページ」として改ページをすると、セクション区切りも入れますか?と設定画面が開きます

Word2010では、「区切り」という文字が見えずアイコン(絵)しか見えない場合があるようですので、アイコンの形を覚えておいて下さい。

セクション区切り

ワード「前と同じ」

参考ページ
Word2010の場合: http://www4.synapse.ne.jp/yone/word2010/word2010_header_totyu.html
Word2007の場合: http://www.wanichan.com/pc/word/2007/09.html
Word2003の場合: http://support.microsoft.com/kb/881557/ja
一般的なページ数の入れ方: http://allabout.co.jp/gm/gc/297892/

substr()、substring() 覚書

substring()もあるので混乱しないように。。。

文字列String.substr()メソッド ⇒ 指定の位置から“指定の文字数分”の文字列を抜き出します。

文字列String.substring()メソッド ⇒ 指定の位置から指定の位置までの文字列を抜き出します。

****************************
String.substr()メソッド ・・・ 指定の位置から指定の文字数分だけ抜き出す

対応バージョン
コアJavaScript 1.2
コーディング形式
string.substr(start, length)
引数
start サブストリングの開始位置。この引数がマイナス値の場合、文字列の終端からの位置を示します。つまり、-1は最後の文字を示し、-2は終端から2番目の文字を示す、といった具合になります。 (0は、一番左端の文字 1は左から2番目の文字)
length サブストリングに含まれる文字の数。この引数が省略されると、返されるサブストリングには文字列の先頭から終端までのすべての文字が含まれます。

リターン値
(startが指定する文字を含む)文字列の先頭部分からlength文字までのコピー。lengthが指定されていない場合は、文字列の終端までのコピー。

解説
substr()メソッドは、文字列のサブストリングを抽出して返します。このメソッドはstringを変更しません。
substr()メソッドは、必要なサブストリングを文字位置とlengthで表します。このメソッドは、String.substring()や2つの文字位置でサブストリングを指定するString.splice()の代替として利用すると便利です。

使用例

var s = “abcdefg”;
s.substr(2,2); // cdを返す。
s.substr(3); // defgを返す。
s.substr(-3,2); // Navigatorではefを返し、IE 4ではabを返す。

バグ情報
マイナス値のstartは、IE 4では機能しません。文字列の終端からの文字位置を表す代わりに、文字位置を0に指定します。

*****************************

String.substring()メソッド ・・・ サブストリングを返す

対応バージョン
コアJavaScript 1.0、ECMA-262
コーディング形式
string.substring(from, to)

引数
from string内で指定されたサブストリングの先頭文字の位置を示す整数。fromの値は0からstring.length-1までの値でなければなりません。
to string内で指定されたサブストリングの最終文字の位置より1だけ大きい整数(省略可)。toの値は1からstring.lengthまでの値でなければなりません。

リターン値
stringのサブストリングを保持し、長さがto-fromの新文字列。この新文字列は、stringのfromからto-1までの文字で構成されます。

解説
String.substring()メソッドはstring中の指定されたサブストリングを返します。fromとtoが等しい場合、String.substring()メソッドは空の文字列(長さ0)を返します。fromがtoより大きい場合、この2つの引数を取り替えてから処理を進めます。

使用上のヒントと注意
String.substring()メソッドは使い方がわかりにくいかもしれません。from位置の文字はサブストリングに含まれますが、to位置の文字はサブストリングに含まれないことに注意しましょう。このような引数の指定方法なので、返されるサブストリングの長さは常にto-fromの値と等しくなります。
文字列からサブストリングを取り出す方法として、開始文字とサブストリングの長さを指定するほうが便利な場合がよくあります。(substr()の方が分かりやすい。)
以下に示す関数を使えばそのように指定できます。JavaScript1.2では、String.substr()を使ってこれを行うことができます。
またJavaScript1.2では、String.slice()メソッドも提供されています。このメソッドのほうがsubstringよりも便利な場合もあります。

Howo to get Google Map API key

APIキー取得
MAPSのAPIキーの取得に戸惑ったので備忘録。
こちらのサイトから引用させてもらいました。

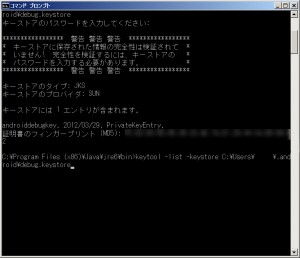
また次のように出る場合は、keytoolまでのパスが通っていないことが考えられます。

「’keytool’ は、内部コマンドまたは外部コマンド、
操作可能なプログラムまたはバッチ ファイルとして認識されていません。」

keytoolはJREのインストール先のbinフォルダ以下にあるので、カレントディレクトリをbinに移動してからコマンドを実行します。
C:>cd “C:Program Files (x86)Javajre6bin”
C:Program Files (x86)Javajre6bin>keytool -list -keystore C:Users【ユーザ名】.androiddebug.keystore

ちなみにPATHが通っているかは、次のコマンドでわかります。
C:>path